


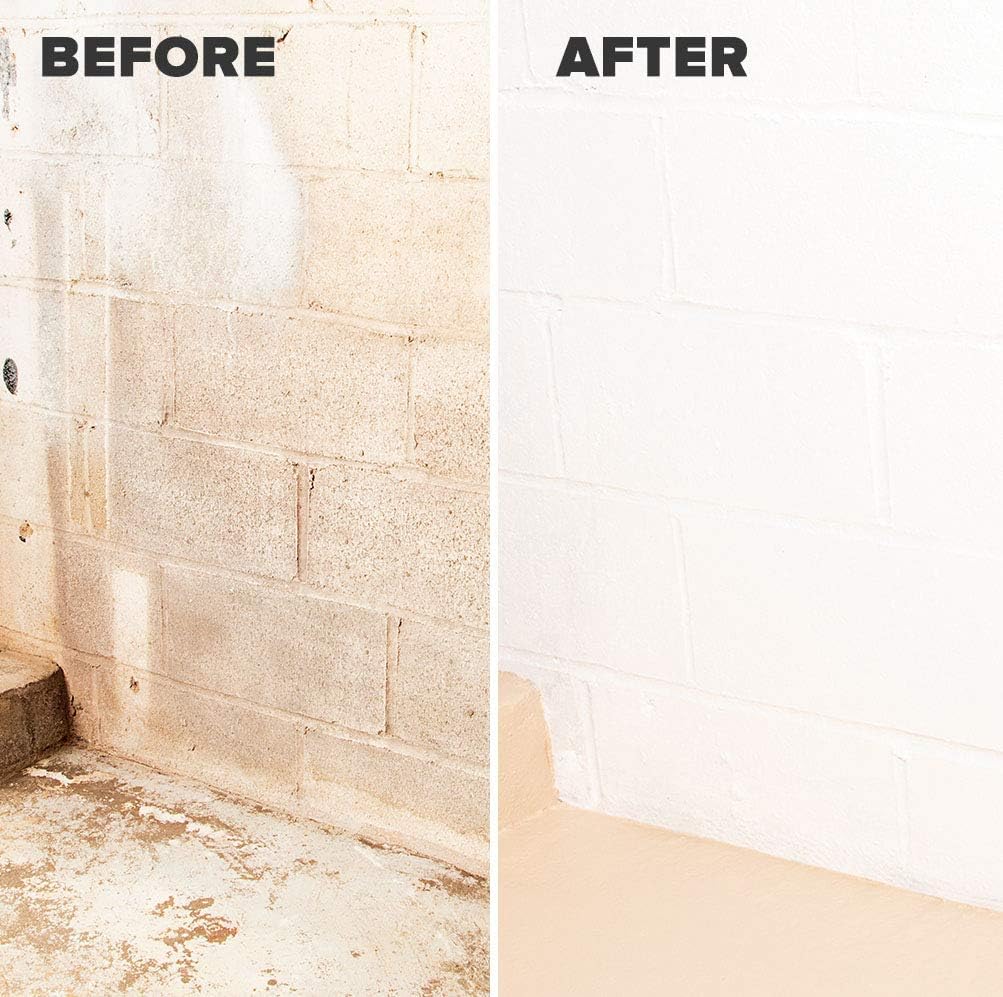


Painting your basement walls with a waterproof finish is an excellent way to protect your home from moisture damage and create a more livable space. Basement walls are prone to dampness and water seepage, which can lead to mold growth, musty odors, and structural issues. By applying a waterproof paint, you can create a barrier that prevents water from penetrating the walls, keeping your basement dry and comfortable.
Preparing the Basement Walls
Before you begin painting, it’s crucial to properly prepare the basement walls. Follow these steps:
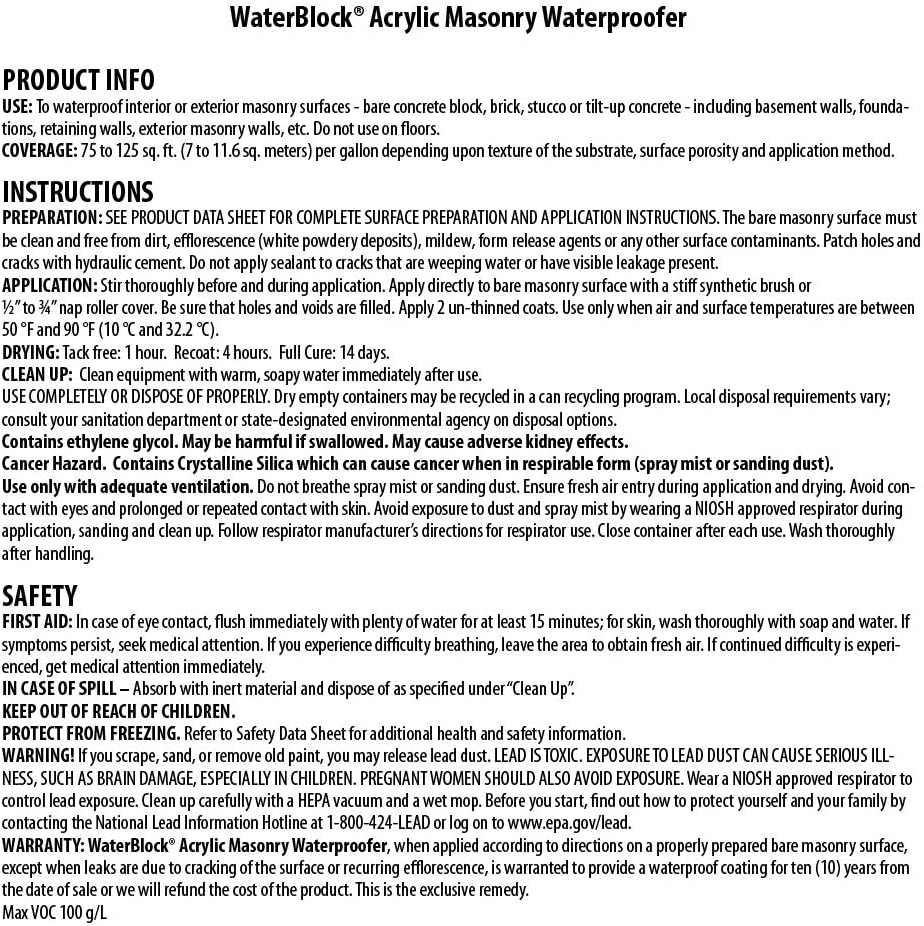
- Clean the walls: Remove any dirt, dust, or debris from the walls using a stiff brush or a vacuum cleaner with a brush attachment. If there are any signs of mold or mildew, clean the affected areas with a solution of one part bleach to three parts water. Allow the walls to dry completely.
- Repair any cracks or holes: Inspect the walls for any cracks, holes, or gaps. Use a hydraulic cement or a waterproof filler to fill in these imperfections. Smooth out the repaired areas with a putty knife and allow the filler to cure according to the manufacturer’s instructions.
- Apply a water-resistant primer: Choose a high-quality, water-resistant primer specifically designed for basement walls. Apply the primer evenly using a roller or a brush, ensuring that you cover the entire surface. The primer will help the waterproof paint adhere better and provide an extra layer of protection against moisture.
Choosing the Right Waterproof Paint
When selecting a waterproof paint for your basement walls, consider the following factors:
- Durability: Look for a paint that is specifically formulated for basement walls and can withstand the damp, humid conditions typically found in basements.
- Mold and mildew resistance: Choose a paint that contains anti-microbial properties to prevent the growth of mold and mildew.
- Breathability: Opt for a paint that allows moisture vapor to pass through the walls, preventing trapped moisture from causing damage.
- Ease of application: Consider a paint that is easy to apply and dries quickly, making the painting process more efficient.
Applying the Waterproof Paint
Once you have prepared the walls and chosen the right paint, follow these steps to apply the waterproof finish:
- Protect the floor and fixtures: Cover the floor and any fixtures or items in the basement with drop cloths or plastic sheeting to protect them from paint splatters.
- Stir the paint: Thoroughly mix the waterproof paint using a stirring stick to ensure an even consistency.
- Apply the first coat: Using a roller or a brush, apply the first coat of waterproof paint to the basement walls. Start from the top of the wall and work your way down, ensuring even coverage. Use a brush to paint around edges, corners, and hard-to-reach areas.
- Allow the first coat to dry: Let the first coat of paint dry completely according to the manufacturer’s instructions. This typically takes between 2 to 4 hours, depending on the paint and the humidity levels in your basement.
- Apply the second coat: Once the first coat is dry, apply a second coat of waterproof paint using the same technique as before. The second coat will provide additional protection and ensure a more even finish.
- Let the paint cure: After applying the second coat, allow the paint to cure fully according to the manufacturer’s instructions. This usually takes about 24 hours, but it may vary depending on the paint and the conditions in your basement.
Conclusion
Painting your basement walls with a waterproof finish is a smart investment in protecting your home from moisture damage. By following the steps outlined above, you can create a durable, mold-resistant barrier that will keep your basement dry and comfortable for years to come. Remember to choose a high-quality waterproof paint, properly prepare the walls, and apply the paint evenly for the best results.
Frequently Asked Questions (FAQs)
- Q: How often should I repaint my basement walls with a waterproof finish?
- A: The frequency of repainting depends on the quality of the paint and the conditions in your basement. Generally, a well-applied waterproof finish can last between 5 to 10 years. However, if you notice signs of wear, peeling, or moisture seepage, it’s best to repaint sooner.
- Q: Can I apply waterproof paint over existing paint?
- A: It’s not recommended to apply waterproof paint directly over existing paint. The existing paint may not adhere well to the new coat, and it may prevent the waterproof paint from forming a proper bond with the wall. It’s best to remove the old paint and start with a clean, primed surface.
- Q: Do I need to apply a sealer over the waterproof paint?
- A: In most cases, a high-quality waterproof paint will provide sufficient protection without the need for an additional sealer. However, if your basement is prone to severe moisture issues or if you want extra protection, you can apply a compatible sealer over the waterproof paint once it has fully cured.